Child’s Pressback Chair – Using Miss Mustard Seeds White Wax

Tags

, , , , , , , , ,

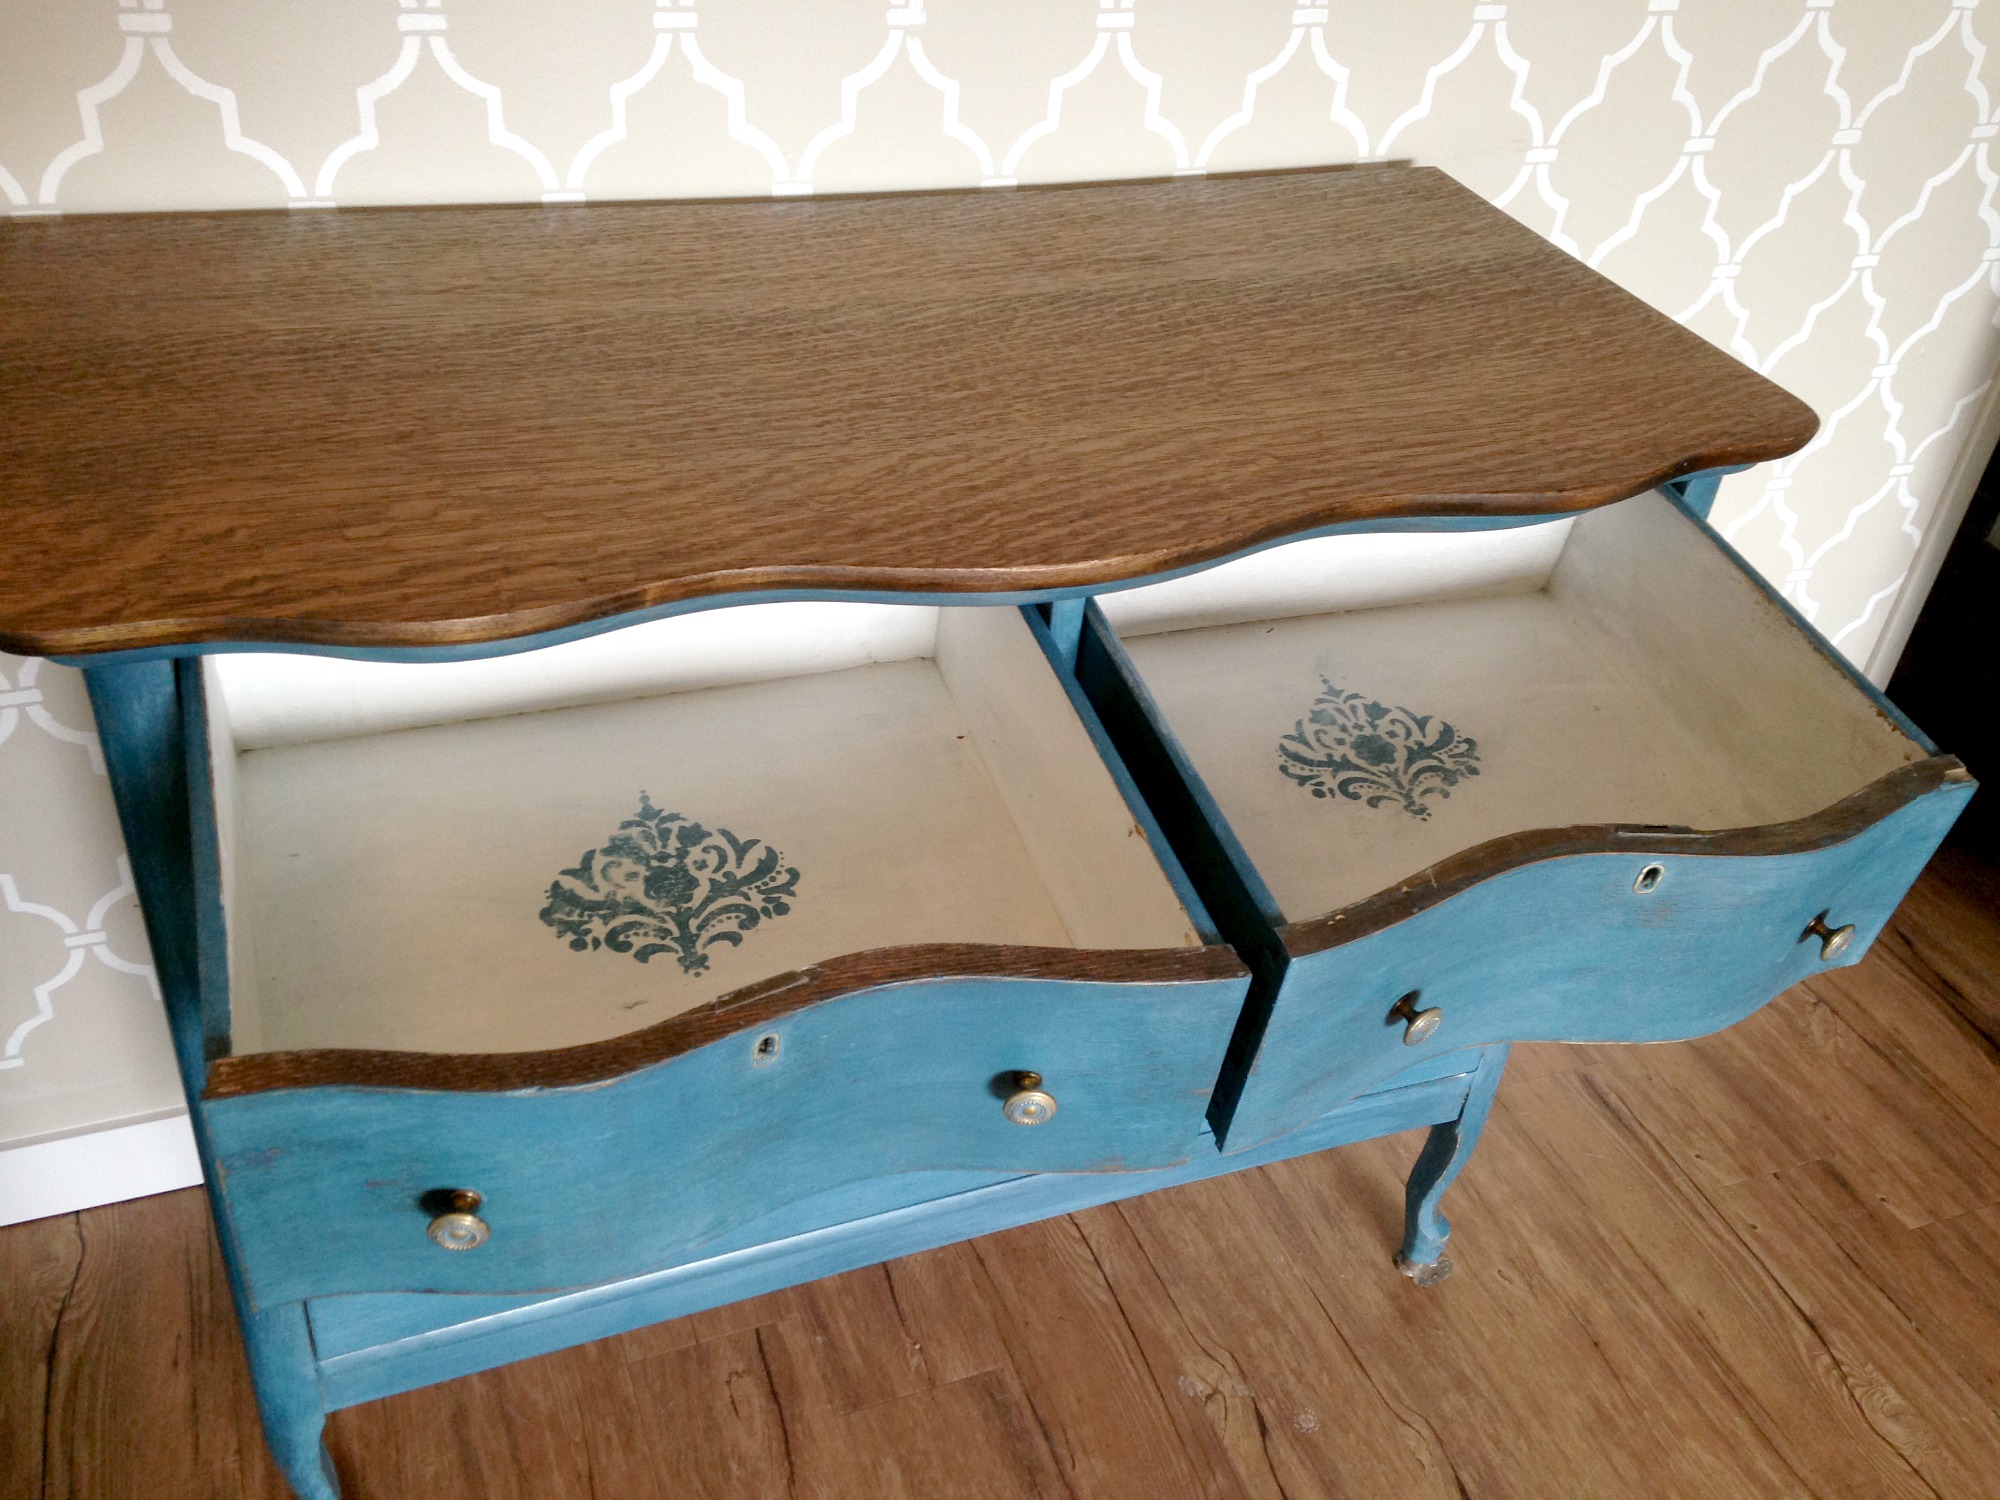
I picked up this chair at Farmhouse Furniture on South West Marine Drive in Vancouver. They have absolutely amazing pieces – inside and out. This one was cheap because it needed some repair work. I will be visiting this place more often – they ship containers of antique furniture from Quebec and there are some amazing finds – lots of architectural pieces, bird baths, antique bed frames, old window panes, shutters… IMG_3591This piece went through a few transformations before I was happy. At first I had painted it daffodil yellow (CeCe Caldwell) and wasn’t completely satisfied, so ended up layering ASCP Antoinette on top of that and distressing it. I wasn’t loving this either, so  I decided to experiment with mixing graphite and duck egg blue to make grey. I normally would have used old white, but my paint supply is running low at the moment, so I used what I had. IMG_3209As it turned out, the Graphite with Duck Egg Blue made this really lovely grey. IMG_3588This was my first time using white wax. I really worked it into all the detailing on the chair with a round brush. I love how it highlights all the details.
IMG_3589As you can see here, the white wax also gives the entire chair a weathered whitewash look. I LOVE the weathered look. This is one of my favourite stencils…IMG_3592IMG_3593IMG_3595Sharing at:

Between Naps on the Porch, Show and Share Monday at: Coastal Charm, Knick of Time (Tuesday), Savvy Southern Style: Wow Us Wednesdays ,The Dedicated House, Redoux Interiors, French Country Cottage, Miss Mustard Seed, Funky Junk Interiors

Trying Milk Paint – A Beautiful Bowfront Dresser in Flow Blue

Tags

, , , , , , , , , ,

I’ve tried milk paint only once before, but the initial experience turned me off a second attempt for quite a while. I had originally painted a little demilune, and was not prepared for the entire piece to literally chip off. I was horrified and did not attempt to work with milk paint again until very recently. I gradually came to the conclusion that I was ready to try again, after admiring many of the beautiful milk paint furniture makeovers in the blogosphere, and also by doing more research on milk paint. Youtube is an amazing thing. There are so many great tutorials out there about the different effects you can achieve with milk paint. I found myself becoming excited and inspired. Timing also played a part, as I discovered that there is a milk paint retailer (Greenworks Building Supply) right here in Vancouver (literally a few km away). I came home with MMS Flow Blue, Ironstone and Grainsack. I also bought her hemp oil and some clear wax… oh, and of course some bonding agent and a little MMS paint mixer. 🙂
Then, I found this beautiful bow front antique dresser on Craigslist.IMG_3128

A couple was moving to Toronto and needed to clear out a storage locker asap. I new milk paint would be a perfect fit for this dresser, because it’s a much thinner paint (than chalk paint or latex) and allows the wood to show through very naturally with a bit of dry or wet sanding.
This time I didn’t want to mess around – I new I was not going for the chippy look on this dresser, so I added the bonding agent and used my MMS mixer. I put on two coats of flow blue and then gently sanded using 220 grit sandpaper, until I got the look I was going for. This time my experience with milk paint was so much more rewarding! I love the look and really love the way that the milk paint seems to leave small variations in colour – the blue seems to take on different hues over the surface of the piece. It really gives it a lovely depth and I couldn’t be more pleased with the result.IMG_3511
I finished by sealing the paint with clear wax and buffing to a shine.
I ended up replacing the hardware on the top two drawers only because one of the original pieces was missing. I found these lovely knobs at Lee Valley and added a little of the flow blue into the crevices of each knob. I love them!IMG_3510The colour is beautiful. As you can see, I left the top unpainted and refinished it and stained it dark walnut and then sealed it with MMS hemp oil. IMG_3605I love the look of the tiger oak. photo 5-2IMG_3606I painted the inside of the drawers in Ironstone and added a stencil to the top two.IMG_3608photo 3-4photo 4-2 copyThis is probably one of my very favourite pieces I’ve worked on. I definitely see more flow blue in my future!


Kathryn

Sharing at:

Between Naps on the Porch, Show and Share Monday at: Coastal Charm Knick of Time (Tuesday), Savvy Southern Style: Wow Us Wednesdays ,The Dedicated House, Redoux Interiors, French Country Cottage, Miss Mustard Seed, Funky Junk Interiors

Vintage Raffle Ticket Desk with Duck Egg Blue and Antibes

Tags

, , , , , , , , , ,

I’m not usually a big fan of Waterfall furniture, but couldn’t resist this desk. It was in really bad shape and the nice guy that I bought it from on Craigslist had had it for over 30 years and clearly did not want it to end up in the landfill. He really likes it now… he asked me to email him the photos when I finished it, and I think he was blown away. 🙂

IMG_3543As you can see the veneer was cracked and peeling off in several places. I have never replaced or repaired veneer, so this was new to me. I knew I would be painting the desk, so decided to glue down the veneer using several clamps and then rebuild the sections that were missing (particularly the left front corner of the desk) using MULTIPLE layers of wood filler and LOTS of sanding.
IMG_3165IMG_3424I experimented mixing a few different colours of ASCP – duck egg blue, antibes and graphite. I ended up using 2 parts duck egg blue to one part antibes with a dash of graphite added to get a lovely vintage green colourIMG_3427 IMG_3425I found these vintage raffle ticket posters at Ikea for $2 and thought they’d look great on the drawers…IMG_3477IMG_3482I traced the drawers onto the back of the poster and used an exact knife to cut the pieces and then mod podge them onto each drawer. I also added knew hardware and finished by distressing the desk and coating it polycrylic. IMG_3571Call me crazy, but I think it’s a slight improvement!
IMG_3547Here’s the backIMG_3562I ended up painting the sides of the drawers in graphite to give them a more polished look.IMG_3558IMG_3546IMG_3557IMG_3554IMG_3543PicMonkey Collage

The desk has now been moved into my new grade two classroom. I love it!

Kathryn

Sharing at:

Between Naps on the Porch, Show and Share Monday at: Coastal Charm Knick of Time (Tuesday), Savvy Southern Style: Wow Us Wednesdays ,The Dedicated House, Redoux Interiors, French Country Cottage, Miss Mustard Seed, Funky Junk Interiors

Industrial Style Graphite Coffee Table

Tags

, , , , , , ,

I’ve been busy this past week trying to finish up some furniture projects before Labour Day. I think I have three more large pieces in the garage and a couple of small ones. There are so many pieces in there right now, it’s very hard to even move around, and it’s getting frustrating trying to find space to work – luckily, then weather had been very cooperative this summer so it’s been possible to most of the work outside.IMG_3404

This piece I picked up at my favourite thrift store in Vancouver – as many of you know I”m sure, you have to go often, but I do tend to get lucky here. I really liked the look of the wood (I think it may even be cedar – its smells wonderful) on this table. Here is a before pic:IMG_3278

The metal corners on it made me think “industrial”. I gave it two coats (in random places) of  watered down graphite, making sure to brush in the direction of the wood grain.

IMG_3400

I used 220 grit sandpaper to sand it off in spots, to let the gorgeous wood grain show through. IMG_3398I decided to try finishing it with MMS hemp oil instead of wax. This stuff is great – it really brings out the wood, and I love that it’s food grade, yet water resistant! I will be definitely be using more of this in the future.IMG_3401

It was really hard to get a decent photo of this table without glare on the top despite the fact that it was a cloudy day. IMG_3403

Look what is growing in our backyard!

IMG_3415

IMG_3416Can’t believe it’s September already!!

Linking to:

Between Naps on the Porch, Show and Share Monday at: Coastal Charm, Knick of Time (Tuesday) , Savvy Southern Style: Wow Us Wednesdays ,The Dedicated House, Redoux Interiors, French Country Cottage, Miss Mustard Seed, Funky Junk Interiors

Graphite Drum Table

Tags

, , , , , , , , ,

I picked up these little beauties at a yard sale this past weekend and couldn’t wait to get started on them. IMG_3290

I love it when all you have to do is paint – no repair work, re-fininshing, replacing hardware, etc. needed!! I have been working on all three, but was anxious to finish the drum table first, as it’s my favourite.IMG_3291

I decided to paint over the leather inlay (gasp!), because it had an ornate gold pattern around the edge which I did not care for. I gave the surface three light coats of graphite, sanded it and then went over the top with dark wax. I also used three coats of polycrylic in a satin finish to protect it. IMG_3307

For the base I used CeCe Caldwell’s Myrtle Beach Sand (2 coats), then used clear wax, followed by dark wax.IMG_3315

I really like the two colours together!IMG_3312I love how the dark wax sinks into the crevices to really give it an aged look. I applied the dark wax in small sections with a brush, then used clear wax on a cut up pillow case to wipe away any excess dark wax I did not want. IMG_3314Her sisters will be finished soon!

She is for sale in the showroom.

Sharing at:

Between Naps on the Porch, Show and Share Monday at: Coastal Charm, Knick of Time (Tuesday) , Savvy Southern Style: Wow Us Wednesdays ,The Dedicated House, Redoux Interiors, French Country Cottage, Miss Mustard Seed, Funky Junk Interiors

Downton Chair

Tags

, , , ,

So… it hasn’t exactly taken me six months to complete this chair, it’s been finished for a while, but it has taken me six months to get around to photographing it! I loved the arms and legs on this chair from the moment I saw it – I knew I wanted to have a wash of white and grey milk paint as a finish and then find just the right fabric. Downton Abbey offered a little help in the fabric department – I’m a big fan of the show and had admired the curtains in one of the episodes (Season 2, I think). Anyway, I happened to stumble upon the exact fabric at Joann’s and it was a done deal. It’s called Bedazzle (silver, I think), by Waverly.

IMG_3138 Remember what it looked like before? You can see how I took it all apart here.beauty1I stripped this chair down to the frame, which needed some repairing, then built it back up again by adding new burlap webbing, foam and batting.IMG_3131I decided against using upholstery tacks around all of the seams, because it seemed much too intimidating  – this is really my first major upholstery project! I hot glued the grey trim onto the fabric to finish it off!IMG_3135IMG_3140IMG_3142I couldn’t part with this piece, so it’s got a special spot in my living room. Like my new stencilled wall? We recently had new flooring installed, so I need to go back and finish the stencil at the bottom…

Sharing Here: Between Naps on the PorchShow and Share Monday at: Coastal Charm Knick of Time (Tuesday) , Savvy Southern Style: Wow Us Wednesdays ,The Dedicated House, Redoux Interiors, French Country Cottage, Miss Mustard Seed, Funky Junk Interiors

Deconstructing a Begere Chair

Tags

, , , ,

Wow! It’s been a few months since I last posted! I have had a really long break from working on any projects, but I am back! Last year I started with the daunting task of removing gobs of staples from a begere chair that I picked up at a local thrift store. It’s been sitting in the garage for almost a year now, which shows how quickly I became discouraged by the slow and painful (physically and mentally!) job of removing all the stubborn staples from it. beauty1

Last week I decided to tackle it again, and have managed, while sustaining several cuts and stabs to my fingers and hands, to remove most of the thousands of staples in this thing. If you ever attempt to reupholster something – especially any piece of furniture with a large amount of staples, I’d highly recommend buying a tack remover. I didn’t find this out until I’d already removed 90% of the staples, but I picked one up at the local hardware store for under $10 and it does make a HUGE difference. It is way easier than using a flat head screw driver. FYI: needle nose pliers are also a must!

I began by removing the panel of fabric from the back of the chair. I was able to preserve the original fabric enough to use it as a pattern when I’m ready to reupholster it. In some places I did have to use an exacto knife to cut around the fabric in order to remove it from staples that were just too embedded in the wood. It was really interesting (and a little scary) opening it up to see what was inside this chair. There were several layers of cotton batting, straw, burlap and webbing. I removed all of these. The straw (there are two different types) –  which, in these old chairs, was originally used because not only was it readily available, but it was extremely cheap – is a serious fire hazard.

IMG_0950IMG_0951IMG_0956IMG_0957
IMG_0958IMG_0959

See how badly damaged the burlap webbing is? I bet your wondering what the pink and black material is on the chair. This was quite well glued on, but I managed to peel a little section away, only to discover that the material is covering a repair to a hairline crack in the wood. This means that this chair has been reupholstered before.  I decided to leave the fabric, not only because it’s really stuck on there, but also because the the original crack does not need further repair. You may notice the crack below this fabric on both sides DOES need repair. This damage was most likely caused after the last reupholster job, and is a result of pressure on this part of the frame where there are two dowels – one on each side – the wood cracked around each dowel. This is nothing a whole wack of wood glue won’t fix!

IMG_0960IMG_0965The seat had three layers of cotton batting, followed by the two types of straw, a thick layer of felt like fabric, and burlap covering the coils.  IMG_0976The nine coils were in good shape, with only two of the ties that had broken off. Once I had removed all of the straw, I gave all the webbing on the bottom (which is in good shape) a very thorough vacuum. IMG_0975I’ve now begun some of the repairs to the frame (gluing and clamping) and have starting painting. I’ve decided to layer on white milk paint with CeCe Caldwell’s Pittsburgh Grey.

Here is my deconstructed begere chair! It still needs some repair work to the frame, but it’s starting to come along.

IMG_0982

IMG_0978Stay tuned for the reupholstery job coming soon!

Sharing at:

Coastal Charm

Savvy Southern Style

Miss Mustard Seed

French Country Cottage

Spoooky Pillows

Tags

, , , , , , ,

My son is a little obsessed with Halloween. I have no idea where he gets it from (hee, hee). He keeps asking me to “put up more spooky stuff” in the house, and I always aim to please!

IMGP1251

I went shopping a few weeks ago, looking for some halloween themed decorative pillows for our living room sofa, but did not find anything I liked. I ended up, however, finding enough left over linen from these pillows to make two more covers and then chose some spooky images from the graphics fairy and transferred them (see how I do this here). My son loves skeletons, so the skull image was an easy choice…

IMGP1252

and I love crows… I added the October 31 text myself by uploading the image into Picmonkey and editing it that way. freakyHe seems satisfied… for now.


Sharing here:

Graphics Fairy

Coastal Charm

Savvy Southern Style

Funky Junk Interiors

Ikea Expedit Bookshelf Transformed Into Custom Kitchen Bench

Tags

, , ,

WOW. What a summer it’s been here in Vancouver. Possibly one of the best ever  – we had so much sun, sun, sun! I wish it could continue a few more months, but already it’s starting to feel a little cooler…. SIGH. Anyway, I have been a little absent from the blogging world trying to take advantage of the great outdoors with my family, and it’s been a blast. Now it’s getting back into the regular routine! I did get a few projects accomplished around the house this summer, and one of them is a new seating bench for our small kitchen. Here’s the BEFORE and AFTER:beforeafter

It can be challenging to find a workable (and aesthetically pleasing!) solution for small spaces. Several months ago, I had swapped out our original oval table and chairs for an oak pedestal table that I found on Craigslist and had painted in old white.IMGP9644

I really liked this table and chairs, but after using them for awhile, my family and I realized that it was just too big for this small space. A friend of mine suggested that we get a bench (she’s European and they are very common there) and I thought that might just be the way to go, so I started consulting Pinterest for ideas.That’s when I noticed “custom” benches made out of Ikea Expedit bookshelves… AND it just so happens that the length of the Expedit EXACTLY fit with the space I had to fill. SOLD! I picked up a white one and also purchased a piece of foam (1.5″) from Joann’s to fit. IMGP1110

I upholstered the foam with Home Decor fabric from Joann’s, by purchasing a thin piece of MDF from Home Depot (the same measurements as the foam and bookshelf), and stapling the fabric to this.

IMGP1107I’m loving the new bench and the storage is fantastic. Before, we had all of my daughter’s art supplies on top of the fridge where she couldn’t access them. IMGP1111I also bought a new kitchen table at Ikea. This one folds up to almost nothing, with 2 drop leaves, yet has 3 storage drawers on each side in the centre. Perfect for this small space!IMGP1113
We also decided to go with stools on the other side of the table instead of chairs, as they are easy to tuck away. IMGP1118Here’s what this area now looks like most of the time, with one leaf up and one down. I also lucked out and found these green outdoor pillows on clearance for $3 each!IMGP1119Here’s the table with both leafs up. The bench is great for kids, because now we can easily fit three back there!IMGP1120I also couldn’t resist the aqua vintage clock.

Sharing here:

DIY Showoff

Coastal Charm

Savvy Southern Style

Miss Mustard Seed

Funky Junk Interiors

Shabby White End Tables

Tags

, , ,

I have to thank my step mother for these end tables, as she is the one that ran down the block in her pyjamas one night to pick them up from a neighbours curb side for me. They are solid, in great condition, just in need of some paint to liven them up. IMGP0588

Here they are in all their wooden glory:

IMGP9407I used white Fat Paint and lightly distressed each table and coated them in latex polyacrylic. I love the knobs  – they totally make tables in my mind. I ordered from Vintage Sky on Etsy. I just noticed that her shoppe is closed because her daughter was killed in a car accident a few days ago… please send out all your warm thoughts to her.IMGP0589IMGP0591I took them with me to the Deja Vu Vintage Market, but they didn’t sell. I’m guessing it’s because they are quite big, but nevertheless I was surprised, because I thought for sure they would be one of the first things to go…

The good news is that they just sold to someone who does staging… so they will be going to their new home very shortly!
IMGP0552Sharing at:

Savvy Southern Style

Coastal Charm

Miss Mustard Seed

Funky Junk Interiors

Get Schooled Saturday

DejaVu Vintage Market

Tags

, , ,

I got to be a part of the fabulous Deja Vu Vintage Market on the grounds of the Wellbrook Winery this past weekend. It was an amazing day, and even the weather cooperated! There were so many fabulous vendors, and it was so nice to see some familiar faces! The Wellbrook Winery is in Delta, B.C., which is about a 20-30 minute drive from Vancouver (depending on traffic). I ended up renting a Uhaul cargo van, and am glad I did, because I didn’t want to make more than one trip!

I didn’t have a lot of time to do a mock set up, so here is some of my stuff piled into the back yard getting ready to load it in the van. This past week, I was furiously trying to get all the pieces finished, waxed, hardware added, and so on.

IMGP0537Here is my booth just before the market opened:

IMGP0543

The pedestal table and chairs sold almost immediately… in face the lovely woman that bought them almost cleared me out! IMGP0555

The mason jar soap pumps were a hit again. I think I sold all but 2 of them. Almost every single person that stopped at the booth picked up the mason jars to look at (yes, we started keeping track!).

IMGP0550I had a few aqua lovers like myself come in and purchase these goodies…

IMGP0554

It always surprises me what sells and what doesn’t. These white end tables are the perfect example – I thought they would go right away, yet they didn’t sell. Same with my grain sack rocking chair!
IMGP0552

IMGP0542

My soy candles were also popular.IMGP0559

IMGP0544

IMGP0557

My french inspired trunk sold to a lovely woman…

IMGP0540

Here is my mother-in-law Frances and me near the end of the day. She was such a big help loading, unloading, setting up the @#$$@#$$##! tent (that I am returning today!!), and keeping a sharp eye on the cash box!

IMGP0586

Now onto some other vendors…

Here is Destin’s booth from Simply White. What a breathtaking display she had. Can you believe this was her first market?! I am blown away by her talent and so glad she’s decided to do this full-time. Her husband was also very kind in helping us unload and haul several heavy items from the van. Not surprisingly, she sold almost everything by the end of the day.IMGP0562

IMGP0561

Here’s another vendor that I wish I’d had more time to spend browsing her booth…
IMGP0564

The CeCe Caldwell gals were also there in full force!

IMGP0565

Here is the winery and food vendors:

IMGP0574

IMGP0573

It was a great day and a lot of hard work, but a lot of fun too. Thanks Maris and Antonella for organizing this market!

Sharing here:

Miss Mustard Seed

Funky Junk Interiors

French Linen Serving Tray

Tags

, , , ,

This tray has come a LONG way looks wise. A friend of mine was moving/purging a bunch of stuff and passed on this tray to me. It was originally a pine colour with brightly coloured painted fruit on it… no, I didn’t get a picture – I guess I was in such a hurry to cover up the ugly fruit!IMGP9752I painted it in ASCP French Linen and added the same french stencil I’ve used on many of my projects. IMGP9753IMGP9952Here it is with a couple of cool jars/vases I picked up on a recent trip to Lynden Washington. IMGP9950

This little beauty will be coming with me to the DejaVu Vintage Market on July 6th at the Delbrook Winery. That is, unless I decide to keep it for myself. I have been known to do that on occasion!

Sharing at:

Coastal Charm

Savvy Southern Style

Shabby Creek Cottage

French Country Cottage

Funky Junk Interiors

Aqua Dipped Demilune Table

Tags

, , , , , ,

I love little demilune tables. They are small, light and are so versatile. Here’s one I picked up recently and will be bringing with me to the Dejavu Vintage market in July. I painted it using Fat Paint in warm white and the dipped legs are Caribbean blue.IMGP9964

Here’s the before:IMGP9571I used a Martha Stewart stencil and very lightly distressed the edges and legs of the table.IMGP9958IMGP9960IMGP9610

Sharing at:

Coastal Charm

Savvy Southern Style

Miss Mustard Seed

Funky Junk Interiors

Another little Cradle: Antoinette

Happy Friday everyone! I don’t know about you, but it’s been crazy busy around here lately. May is a huge birthday month in our family, and on top of that there are several other birthday parties for my daughters classmates this month…. AHHHH! The weather has been beautiful here, so I did try to get out and do a little painting this past week and here’s what I was working on.IMGP0002IMGP0001

IMGP0032


This little cradle will be coming with me to the Deja Vu Vintage Market in July. I really love the ASCP colour Antoinette – I bought a little tester on my last trip to Grandiflora in Lynden (love that store!), Washington. I have enough left over to add it to part of a little secretary desk I”m working on for my daughters bedroom. IMGP0034

IMGP0035

A few people have asked my about my stencils. I get almost all of my stencils from the dollar store here in Vancouver  – usually Dollarama has the most selection, but with any store like this, it can be hit or miss. IMGP0058IMGP0059

Sharing at:

Miss Mustard Seed

Funky Junk Interiors

The Shabby Creek Cottage

Coastal Charm

Savvy Southern Style

Singing in the Rain: Canvas Art

Tags

, , ,

My three-year-old son loves singing and probably before he was even two, he decided that Gene Kelly’s Singing in the Rain was his favourite song. He loves to watch the clip of Gene Kelly on youtube and has more than once been caught outside with an umbrella singing the song and imitating him… it’s seriously cute, and no, I have not yet been able to catch it on video (his impromptu bursts of song always catch me unprepared).prom09-22-2 I wanted to somehow incorporate this song into art for his bedroom. I can’t take any credit for this idea – it’s one I pinned from Southern Belle Soul Mountain Bride Heart. I just put my own spin (or tune) on it! I used some of my sons’ favourite lines from the song: I’m laughing at clouds (so dark up above); the sun’s in my heart (and I”m ready for love);  Dancing and singing in the rain.

IMGP9977

I had four blank canvases that I had purchased at Michaels’ a while back  – one of which I used for my Pottery Barn Santa. I loved the idea of using wood, but had these available and they were the size I wanted, so I decided to use them instead. I also had on hand one roll of music note wrapping paper that I had picked up from Ikea at Christmas. I love this paper and wish I had bought more… there are so many things you could use it for! I used mod podge to stick it to the canvas and basically wrapped each frame like a present.

IMGP9618IMGP9619As you can see, I tried a few different colours of wrapping paper, but ended up liking the music sheet best and ended up re-doing the other one. I bought some vinyl letters (3 inch I believe) and carefully placed them where I wanted them and painted over top. One word of advice – if you are going to do this, I would strongly recommend buying at least two packages of letters. I only bought one and quickly realized that I did not have enough of the letters I needed, so I had to do the canvas in sections. It was a pain!! IMGP9625All in all I’m happy with how they turned out and I like having something personal like this in my son’s room. I think he does too!IMGP9980Almost time for a haircut!!IMGP9978

I think my favourite part of this project is that the music note paper shows through in words of the song. How fitting!IMGP9967IMGP9991Sharing here:

DIY Showoff

Coastal Charm

Savvy Southern Style

The Shabby Creek Cottage

French Country Cottage

Funky Junk Interiors